Thursday 31 March 2016
Friday 29 January 2016
Apple Crumble Energy Bombs
I originally developed this recipe over the festive period as a 'Healthy Christmas Nibble' option in attempt to capture all the warm, sweet flavours of the holidays, except without the added guilty line 'it's OK, it's Christmas!' Luckily these little gems are packed with all-natural and nutritious ingredients, that you can keep your sweet tooth satisfied guilt-free year round!

The reason for naming these balls of goodness 'Energy Bombs', is because the recipe incorporates a fiesty punch of 'energy boosting' foods. You get both fast and slow digesting carbohydrates coming from the natural sugars in the oats, apple and pure maple syrup, combined with the slower digesting healthy fats from peanut butter and coconut oil. In turn, this makes them a fantastic pre-workout snack, or delicious & convenient little 'pick-me-up' when you're on the go!

These also make a great little sweet-treat to accompany a nice hot cuppa, or even a healthy little dessert in place of those naughtier not-so-natural apple pies and crumbles!
50g rolled Oats
30g smooth Hi-PRO peanut butter
30g finely chopped pink lady apple
20ml 100% pure Canadian maple syrup (or honey/agave)
10g Extra Virgin Organic Coconut oil
1/4 tsp cinnamon

1. Combine peanut butter, maple syrup, and coconut oil together until a smooth creamy mixture is formed
2. Lightly toast apples for approximately 3 minutes in a pan until lightly browned
3. Stir the apple and oats into the peanut butter mixture
4. Use your hands to mould the mixture into 6-8 balls
5. *Optional step* - Insert toothpicks to form 'popsicles'
6. Leave to set in the fridge for 30mins (or freezer for 15) before devouring the sweet & sticky apple crumbly goodness!
Macros per Energy Bomb (based on 7 bombs):
77kcals, 2g Protein 7g Carb 4g Fat 1fiber

Guilt Free Chocolate Fudge Brownies with a Protein Peanut Butter Frosting
I think I am yet to meet an individual who doesn't like chocolate or peanut butter- and rightly so I'd say! If you haven't tried the two together yet, you can only imagine that combination of the two definitely become a force to be reckoned with, ESPECIALLY in the form of a Brownie!

Not only do people tend to associate brownies with being a delicious treat, and a mouthwatering tastebud tingler, but they also get the bad rep of being a unhealthy junk, guilt-food, and a bit of a waistline teaser! What if I told you, you could have all the flavour and fugdy texture of a naughty traditional brownie, minus the guilt, and instead one that could offer a whole host of nutritious benefits to go with it? You wouldn't believe me right? Well let me prove you wrong!


 1. Pre-heat fan oven to 180 degrees celsius.


Not only do people tend to associate brownies with being a delicious treat, and a mouthwatering tastebud tingler, but they also get the bad rep of being a unhealthy junk, guilt-food, and a bit of a waistline teaser! What if I told you, you could have all the flavour and fugdy texture of a naughty traditional brownie, minus the guilt, and instead one that could offer a whole host of nutritious benefits to go with it? You wouldn't believe me right? Well let me prove you wrong!
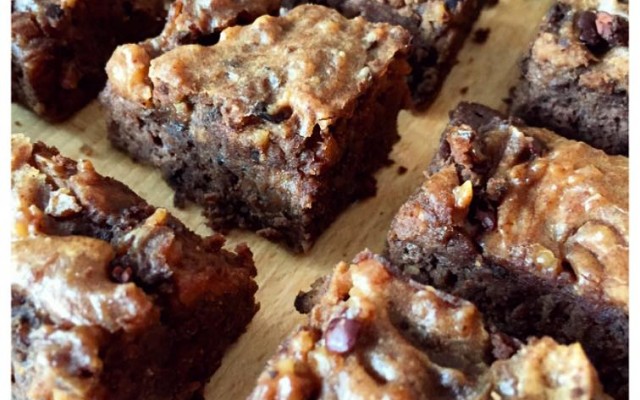
As stated by my personal 'taste-testers', these healthy Chocolate Fudge Brownies are out of this world, and taste just as good (if not better) than your traditional refined sugar-loaded, over-processed ones! With them being made from all natural ingredients, they are also flour-less, gluten-free, refined sugar-free, and free from any artificial ingredients or flavourings.
Since these brownies are high in protein, healthy fats, and fiber, they work in perfect harmony to keep you fuller for longer as well as keeping blood sugar levels stable to ensure you get a good prolonged energy supply (unlike your traditional brownie which would typically spike your blood sugar levels and eventually cause you to crash!).

Another gold star for these beauties are that they virtually take minutes to prep and make... I think the hardest part was opening the cans or jars!
That being said if I haven't sold it to you already, I think you should just make the damn things and find out for yourself!
Ingredients for the Brownie:
1 can Black Beans drained and rinsed (200g)
2 large free range eggs
60g pure maple syrup
35g extra virgin organic coconut oil or grass fed butter -(I use coconut oil because I love the slight hint of coconut it gives to the brownies but feel free to use grass fed butter as an alternative!)
15g Cacao (or Cocoa) powder - (I used Creative Nature Superfoods Raw Cacao powder- I found it was less bitter to using regular cocoa powder!)
1 tsp natural vanilla extract
1 tsp baking powder (use gluten free if intolerant)
Pinch of Himalayan pink salt (or normal sea salt will do)
Ingredients for the Protein Peanut butter 'Frosting':
2 tbsp natural crunchy peanut butter (smooth is also fine, however I like the added texture from the crunchy!)
50ml unsweetened almond milk
1 scoop Reflex Nutrition Chocolate Peanut Instant whey Pro*
Optional: Sprinkling of Cacao Nibs for texture and extra chocolatyness! (I used Creative Nature Superfoods)
 1. Pre-heat fan oven to 180 degrees celsius.
2. Whizz up all ingredients for the brownie in a food processor until is has reached a smooth consistency (you may need to scrape down the sides/blender once in between).
3. Pour the batter into a 6"6" baking tin lined with a little coconut oil on some grease proof paper and gently tap/shake to ensure the batter is spread evenly
4. Before placing it in the oven, make your 'frosting' by heating the almond milk and peanut butter together in the microwave on a low heat for 60-90 seconds. Once this has been stirred and combined, mix in your whey.
5. Place the brownie tin in the middle shelf of the oven for approximately 10 minutes (or until the top looks like it is just about to start cooking through). Then take it out and smear on your protein peanut butter frosting and cacao nibs before placing it back in the oven to cook for a further 8-10 minutes.
6. You should know that the brownie is cooked when it springs back a little when touched.
7. Holding the grease-proof paper, remove the brownie from the tin, then very carefully peel down the sides of the paper. Cut the brownie into 12 pieces then use a spatula to carefully transfer the pieces onto a plate or cooling wrack before devouring... If you can wait that long!
*The whey can be substituted for a sweetener of choice, however this will obviously create a slightly different flavour/texture and alter the macronutrients in terms of protein/carbohydrates. As an alternative to using whey, natural sweeteners I would recommend are either honey, maple syrup, stevia, or xylitol.

Wednesday 25 February 2015
Guilt-Free Chocolate Protein 'No-bake' Cheesecake (Vegan Friendly)
I had never been a huge fan of cheesecakes, until I was introduced to the famous Cheesecake Factory during my trip to Vegas last year... Let's just say it's a restaurant fit to make anyone turn into a cheesecake lover!
 The base of this cheesecake has a deliciously sweet, crumbly texture, yet the top is smooth, creamy and indulgent.. For me, this is everything a cheesecake should be! Not to mention the compliments added from the sharp freshness from the raspberries, and an extra chocolately crunch from cacao nibs... These two little things truly send this cheesecake to whole new level!
 4. Layer your cling-film lined tub firstly with your cheesecake top mixture, then the base mixture, ensuring each layer is lightly pressed and smoothed down properly.
 5. Place in the freezer for an hour and allow the cheesecake to set.
 7. Finally, top it off with some raspberries and generous sprinkling of cacao nibs. Yum!
Last week whilst I was enjoying a dinner out at a beautiful London restaurant (The Bluebird, Chelsea- stunning!) with some friends, I found myself opting for their gingerbread cheesecake. Not my usual go-to but I fancied something a little different, but it was so tasty that it re-ignited my cheesecake cravings and I've been craving it a little ever since! Now as we know with most delicious desserts, they can come with plentiful unwanted trans fats and high sugar carbs, which should be enjoyed in moderation or on the odd occasion. Hence why I thought I'd try and come up with a version of my own that everyone could enjoy guilt-free, by using natural and unrefined ingredients that wouldn't leave you with the feeling it needed to be sweated out in the gym the next day!

One thing I love about this cheesecake is that it's packed with a host of amazing beneficial healthyfats from coconut and flax seeds. Also, the additional boost of protein, with the high fiber base makes this a great healthy, balanced treat which unlike a regular cheesecake, will keep blood sugar levels stable and leave you feeling much more satisfied.
The base of this cheesecake has a deliciously sweet, crumbly texture, yet the top is smooth, creamy and indulgent.. For me, this is everything a cheesecake should be! Not to mention the compliments added from the sharp freshness from the raspberries, and an extra chocolately crunch from cacao nibs... These two little things truly send this cheesecake to whole new level!A tasty cheesecake that will leave you satisfied, energised, and give you a host of health benefits whilst indulging? Or a cheesecake that may leave you feeling sluggish and perhaps slight guilty with its empty high fat/high sugar content? I know which I would gladly regularly indulge in!
Ingredients:
For the cheesecake top:
1/2 pot (62.5g) of vanilla Coyo (or you could use coconut cream from a tin instead)
1 scoop Reflex Nutrition chocolate chocolate whey (Reflex chocolate vegan protein for the vegan friendly version)
1/4 tsp cinnamon
For the base:
14g (2 tbsp) thick milled or chunky traditional oats
5g (1 heaped tsp) Flax seed
7ml (1 tbsp) agave syrup (or honey for non-vegan version)
5g (1/2 tsp) virgin organic coconut oil
1/4 tsp cinnamon
For the topping/decoration:
Fresh Raspberries
Raw Cacao nibs (available from Creative Nature Superfoods) or Dark Chocolate
1. Combine your cheesecake top ingredients together in a bowl and set aside whilst you line a small pot or ramekin with some cling film (I used my empty plastic Coyo tub!).
2. Melt and combine your agave syrup and coconut oil together in a microwaveable bowl for 10-15 seconds.
3. Stir in and coat your oats, flax seed and cinnamon with the agave and coconut oil mixture.
6. Bunch the cling film together and pull out the cheesecake from the pot/ramekin. Then turn out the cheesecake onto a plate before carefully removing the cling film.
Sunday 11 January 2015
Healthy Herb & Cheese Sweet Potato bites
If you have been following my blog recipes for a while, you will have probably established how big of a sweet tooth I have, (much like my mother... Thank god for healthier guilt-free alternatives!). My dad on the other hand prefers to snack more on savoury foods. Hence why this time, I thought I'd attempt something he could also enjoy, and prevent him from nibbling on the fried Indian snacks we have lying around from recent wedding celebrations!


Since I had a pre-baked sweet potato sitting in the fridge waiting patiently to be eaten, I thought I'd experiment with it a little by combining sweet and savoury flavours so that both parents could take advantage this weeks creation. It is a common thing to eat sweet potatoes with savoury dishes after all, so I figured there should be no reason why this combo wouldn't work... I wasn't wrong!
The main aim with these were to ensure they were small enough to have as a healthy snack on the go or savoury treat to have with a hot cuppa, yet satisfying enough to be enjoyed in moderation. Thankfully they were just that! Deliciously herby and moist, and the melted cheesy centre when bitten into as they came fresh out of the oven just sent these to another level!
As with all my recipes, not only are they made from natural and unprocessed ingredients, these are gluten-free, and wheat-free since the base of this recipe comes from sweet potato and quinoa- two incredible nutrient dense carbohydrates sources!
Ingredients:
250g (cooked weight without skin) or two large sweet potatoes (I find slow baked is best!)
100g quinoa flour (or buckwheat would work well too- just blend your grains in a food processor to turn it into a flour)
30g organic grass fed butter
32g of your favourite cheese cut into small cubes (I used a black peppered cheddar which tasted insanely delicious!)
1 large free range egg
1 tsp dried mixed herbs
1/2 tsp baking powder
1/3 tsp sea salt
1/3 tsp black pepper
1. Pre-heat fan assisted oven to 180 degrees Celsius.
2. Simply place all ingredients except the cheese into an electric mixer/food processor and mix until well combined. Alternatively separately mix the wet (sweet potato, butter, egg) and dry ingredients (quinoa flour, baking powder, herbs), then combine the two together. It should form a smooth paste much like a sloppy cake batter!
3. Line a cupcake tray with 16 cupcake cases, and use about 2/3 of the batter to spoon roughly one heaped tablespoon of the mixture into each
4. Evenly distribute the cheese between the cupcake cases, placing a couple of cubes into the centre of each
5. Evenly distribute the remaining batter between the cupcake cases with the remaining batter to ensure the cheese is covered
6. Place in the oven on the middle shelf and bake for 20-25 minutes until the tops have become firm and slightly golden
7. Best enjoyed hot so this step requires you to just, well... EAT! ;)
Store in the fridge for up to 3-4 days.
Can be enjoyed hot or cold! To re-heat, either microwave for 15-20 seconds, or re-heat in the oven on 200 degrees for 5-8 minutes.
Approximate macro breakdown per cheesy bite:
77 kcals, 3.1g Fat, 10g Carb, 2.1g Protein, 1g Fiber
Saturday 3 January 2015
Energising Fruit & Nut Flapjacks
With the festive season coming to a halt, it's about that time of year where I'm sure many of you will be setting up (if not done already), your New Years resolution to ween yourselves off the booz and unhealthy indulgences, and get that beach body on its way!


Well if you're anything like my family and I, you'll be missing the fruity mince pies and those sweet, warming Christmassy smells and flavours little! This recipe was in fact developed to help my mum ween herself off those calorific mince pies which tend to become part of her daily tea-time routine around Christmas!
Best thing about this versatile recipe, (as with most of my recipes) is that it requires minimal effort, and uses the simplist of ingredients that you'll more than likely have laying around the kitchen! Apart from the additional potent nautural energiser powder 'Guarana', which I decided to use thanks to Creative Nature Superfoods that is! (But that can be resolved by following the link, or looking down the free form isle in Tesco's or Ocado! ;) )
Guarana comes from the seed of a Portuguese climbing plant of the maple family. It is commonly used in energy drinks, herbal teas, and even weight loss pills in South America due to its natural caffeine content being twice of that found in coffee seeds! This little addition ensures these fruity, moist, flapjacks work great as a morning breakfast snack, or as a pre-workout energy booster!
Ingredients:
150g rolled oats
1 large (120g) banana
16g (1 tbsp) virgin organic coconut oil or grass fed butter
2 tsp (8g) xylitol (or natural sweetener of choice - honey/maple syrup/stevia)
1 tsp cinnamon
1 tsp (3g) Creative Nature Superfoods Guarana
1/2 tsp baking powder
About 300-350ml water (or preferred milk/liquid of choice)
Optional add-ins:
35g sunflower seeds
30g crushed almonds
15g dried sweetened cranberries
15g dried sweetened blueberries
15g dried sweetened ginger chopped into small pieces
1. Pre-heat fan oven to 180 degrees Celsius
2. Combine all dry ingredients into a bowl before gradually adding the water (or liquid of choice). Add just enough to produce a 'cake batter' like consistency
3. Line an 8" square baking tin with grease proof paper and grease with some grass fed butter or coconut oil.
4. Pour the 'batter' into the middle of the tin, shake just a little so it spreads evenly. Don't worry if it doesn't quite reach the edges, it will expand a little in the oven!
5. Place on the middle shelf of the oven and leave to bake for 25mins (give or take a few mins depending on your oven! You should be left with a golden brown top and a SLIGHTLY gooey skewer once cooked.)
6. Carefully remove the grease proof paper and leave to cool on a cooling wrack before cutting into 12 slices and devouring with a cup of tea!
Makes 12 slices
Macros per slice:
162 kcals, 6.9g Fat, 19.1g Carb, 4.3g Protein, 1.4g Fiber
*Feel free to make these as naughty or nice as you like! Add or sub in some chocolate chips as a little treat, or unsweetened dried fruits/nuts to keep it nice and healthy!
Subscribe to:
Posts (Atom)